5 Steps to Successful Seed Starting
Supplies Needed:
Viable seeds
Soilless potting mix
Sterilized or new seedling pots or trays
Pencil or dowel
Plant labels
Humidity dome or large plastic bag
Grow lights
Step 1: Select your seeds and read the seed packet directions. 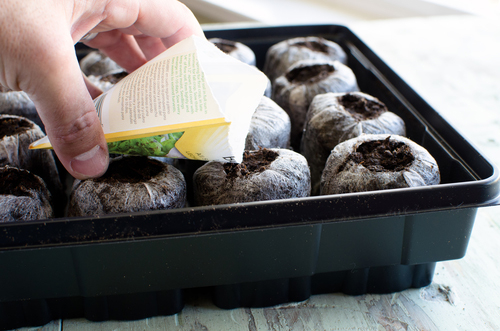 Buying fresh seeds is the first step - quality is key! Check the packaged date stamped on your seed envelope to make sure that your seeds are the freshest possible. Read about the recommended seed planting depth, the optimal germination temperature, and the number of days to plant maturity. Find the typical last frost date for your area, and starting with the date, count backwards by the days to maturity (if May 1st is the last frost day and the seed has a 60-day maturity, plant around March 1st). This is when you should plant your seeds. Some need to be planted months in advance while some seeds mature within a couple weeks. TIP: If the seeds are old, test their viability by soaking two paper towels with water and placing a few seeds between the towels. Wait a few days and see if they germinate. If nothing happens, these seeds will not germinate. Start with a new packet of seeds.
Step 2: Prepare your planting containers
Choose a container for planting your seeds. Egg cartons, peat pots and special seed-starting flats all work well. Make sure you punch holes in the bottom for drainage and if necessary sterilize your containers. If you are reusing pots from a previous planting, soak the container in a bleach/water mixture (1 part bleach to 10 parts water), scrub and rinse thoroughly with hot water.
Step 3: Choose your soilless potting mixture.
Do not use soil from your garden - you run the risk of introducing disease to your seedlings! Be leery of a potting mix. It may have too much fertilizer in it which could burn the seeds. Your best option is to purchase a soilless garden soil mixture that is well aerated. Coir pith is also a good soilless seed starting option. Wet the potting mix with lukewarm water so it is damp but not soaking. Fill each seed cell with soil and make sure the soil is tamped down and evenly spread throughout the cell. TIP: You can use the bottom of another tray to tamp down the soil.
Step 4: Plant the seed at the proper depth.
To bury the seed, use a pencil or your finger to make a hole at the required soil depth. Drop in the seed and fill the hole with soil. Gently compress the soil over the seeds to make sure the seed is coming into contact with the moist soil. When planting indoors your seeds may be lightly scattered with soil and do not not require deeper planting.
Step 5: Cover your seeds.
Once the seeds are planted, carefully place the seed tray in a large plastic bag and twist the end shut or cover the tray with a humidity dome. This will help to hold in the moisture during these first days of germination. Placing the seeds on top of a Seedling Heat Mat will help to speed the germination time. Check under the plastic every day, and as soon as the seedlings start to poke through the soil, remove the plastic and move the plants to a sunny location or for the best results, place the seedlings under grow lights. If you are using a humidity dome instead of a plastic bag it is important to ventilate your seedlings as well. You can easily prop up one end of the dome with either straws or skewers.
Hints to help keep your seedlings thriving!
- Keep the temperature consistent
The soil temperature of the seedlings should be kept the same throughout the day and night (generally about 65-75 degrees). Some ways to help maintain the temperature are to keep the seedlings on a seed heat mat or some other heat source like the top of the refrigerator. Bottom heat encourages vigorous root growth - Happy Roots = Happy Plants. - Use grow lights
Soon after the seedlings emerge, they will be looking for light to help them grow. Without adequate light, the seedlings will get long and spindly. Adding a grow light will help your seeds continue to flourish. Fluorescent lights are very popular because they give off very little heat. The light can be put just inches above the seeds, so they can get as much light as possible. Fluorescents are also very energy efficient to run. The grow lights should be kept on about 16 hours each day. If you don't have a grow light a sunny window will work fine. - Water with lukewarm water
Watering can be a touchy issue with new seedlings. You don't want them to dry out yet you don't want to over-water them either. Water them with tepid water so the water will more quickly evaporate so they do not sit in soggy cold soil which leaves them vulnerable to fungal diseases. Bottom watering is ideal as it makes for healthier growth and prevents damping off. - Fertilize your seeds:
Once your seedlings have used up their energy reserve from the seed pods, they will need a supplementary food source (soilless potting mixture has no nutrients). When your seedlings first true leaves have emerged, it is time to begin a half-strength liquid fertilizer regimen on a weekly basis. It is important to start the fertilizer within 72 hours of their first leaves. - Provide ventilation to the seedlings
To promote good air circulation, place a small fan near your seedlings. Keep the fan on low and direct the air so it blows across the soil level where air can get stagnant. Adding air circulation will help prevent damping off and help keep your plants from getting leggy and weak.
Before long, your seeds will be ready to move to the greenhouse. Once the threat of frost has past, the seedlings can be transplanted into the garden. See our information about transplanting for helpful transplanting hints!